Mosmar Snippets User Guide
Launching Snippets
The Snippets clause library window is available in each Word document and each Outlook email (whether a new email, reply or forward).
Navigate to the Home menu and click the Snippets button.
Inserting Snippet content into documents or emails
There are 3 ways to insert content from Snippets into a document or email:
- Click and browse through all the folders to find the required Snippet. Drag and drop the Snippet into the document at the required place.
- Click and browse through all the folders to find the required Snippet. Click the Insert button when your cursor is at the required location in the document or email.
- Type a Snippet code at a location in your document or email and press the F3 keyboard shortcut to insert the Snippet.
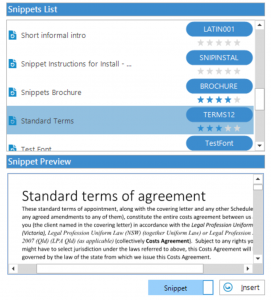
Previewing a Snippet
It’s often helpful to review a Snippet’s content before deciding to insert it into the document or email.
Locate a Snippet by browsing or searching and select it.
The preview will appear below, with a scrollbar to move through it.
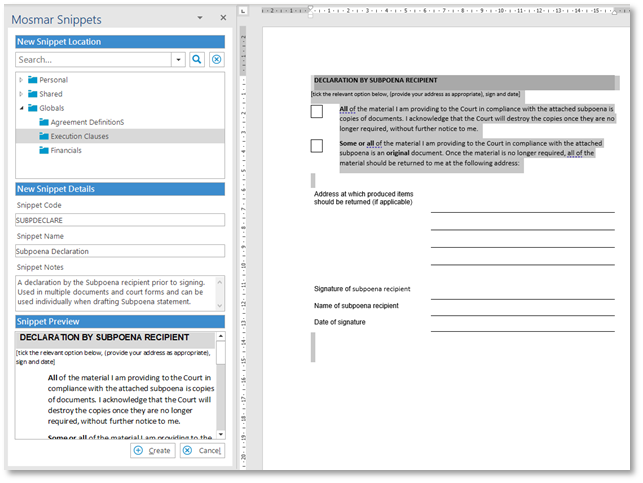
Creating a Snippet
- Highlight some content in your document. It could be a single paragraph, multiple paragraphs, contain images, tables etc. The content can also have styles applied, this is actually desirable.
- Click the + button at the top left of the Snippet pane.
- Browse through the Snippet libraries to find the folder that should contain your new Snippet.
- Enter a Code. This must be unique inside that Library
- Enter a Name. This should be a clear description of what your Snippet represents.
- Enter Notes. This is optional, but is very useful to helpful people to find and use your Snippet. Particularly when contributing to shared library.
Updating Snippet Content
- Insert the Snippet into your document and make the required changes to the content.
- Highlight the updated content.
- Find the Snippet inside the Mosmar Snippets pane
- Right click and choose Update “SnippetName”
- Tick the box Change Snippet Content
- Click Update
Reviewing Snippet Properties
The following properties are available for each Snippet:
- Name – a friendly name to identify the Snippet (default length is 35 characters)
Available in the Snippet List - Title – a unique code to enable quick access to Snippets (default length is 15 characters)
Available in the Snippet List - Notes – details about the Snippet
Available by clicking the Snippet code
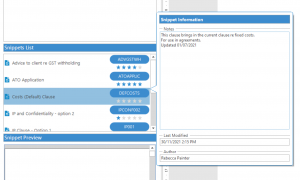
- Last Updated Date
- Author
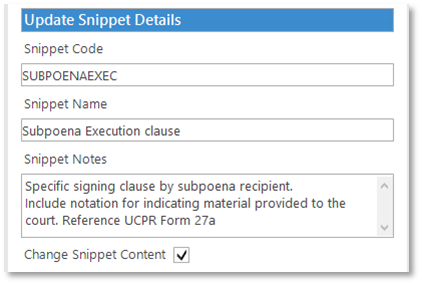
Updating Snippet Properties
- Right click the Snippet and choose Update [SnippetName]
- Modify the Code, Name and Notes
- Click Update
Creating Folders in the Snippet libraries
Creating Folders inside the libraries can help with categorising and easily finding content.
- Right click the Snippet library or subfolder and choose Add New Folder inside [library/folder name]
- Name the folder and then click away from the folder to commit the change
Note: the ability to create a folder is determined by the permissions applied to the Snippet network or Sharepoint location. If you cannot create a folder and need to, get in contact with your IT team for assistance.
Searching in Snippets
Snippets will search for content in the folder you have highlighted plus any subfolders that may exist.
If you would like to search within a particular folder, browse to that location first before running the search.
Snippets will return any content that contains the search string provided (see below sections for which areas of the content are searched)
EG – Search Strings:
Searching for ‘intellectual property’, will return any Snippets that contain the word ‘intellectual’ and the word ‘property’.
EG2 – Boolean Searching:
Searching for intellectual AND property NOT corporate will return any Snippets that contain the word ‘intellectual’ and the word ‘property’ but not the word ‘corporate’.
EG3 – Metadata Searching:
Searching for author:esther title:BANK001 will return any content where there is an exact match of those properties.
For Sharepoint users
Your search term will be found in:
- Snippet Name
- Snippet Code
- Snippet Notes
- Snippet contents
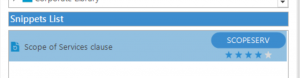
Note: you are using Snippets connected to Sharepoint if you can see star ratings applied to Snippets.
For Network users
Your search term will be found in:
- Snippet Name
- Snippet Code
- Snippet Notes
It will not do a search across the content of a Snippet.
Moving a Snippet
- Right click the Snippet you wish to move and choose Update [snippetname]
- In the Snippet Location, browse to the new location that you wish to move the Snippet to and select that folder.
- Click Update.
Rating a Snippet
- Search for or navigate to the Snippet you wish to rate
- Click the number of stars the indicate how highly you rate the Snippet
For Snippets that are shared within your company, your rating will be combined with others to provide an average rating for that Snippet.
Note: Rating only applies to Sharepoint integrated environments
How does Formatting work with Snippets
For Word documents and New Outlook Emails
When inserting a Snippet into a document or new email message, the Snippet content will try to adopt the styles of the destination document/email.
EG1: If a Snippet is formatted in a Heading 1 style that exists in the destination document or email, it will update the Snippet to that style configuration upon insert.
EG2: If a Snippet is formatted in a Banana style that does not exist in the destination document or email, it will create the Banana style upon insertion of the Snippet.
For Outlook email replies and forwards
There is a setting to determine the formatting rule that will apply. This setting in SnippetSettings.xml is:
If this setting is set to True, the source formatting for the Snippet will be used upon insertion.
If this setting is set to False, the same formatting logic will apply as for Word documents and new Outlook emails.
Troubleshooting
My Snippets pane has closed or disappeared
In your Word document or Outlook email, simply go to the Home ribbon and click the Snippets button again for the pane to reappear.
My search results don’t return a Snippet I recently created
Sharepoint searching requires new content to be indexed before it can be searched. This can sometimes take a few minutes and may result in your new Snippet not appearing in search results.
A workaround is to browse to the folder you created the Snippet in and use it from there.
I can’t create a Snippet
This may happen because:
- You haven’t highlighted any content in the document or email first
- You don’t have permissions to create a Snippet in the location you’ve selected
Installing Snippets
- Install Snippets:
- Run the MosmarSnippets.msi from either the Snippets 64 bit or Snippets 32 bit folders, depending on the version of Microsoft Office that you have installed.
- Note: It is important that you match the bit version of Snippets to the bit version of Microsoft Office. The bit version of Windows is not relevant.
- Also ensure that the SnippetsSettings.xml is present in the same folder as the MSI file. If this is in a different location, the installation will fail.
- Install the Sharepoint integration:
- Run the Mosmar.SharePoint.Setup x64.msi from the Sharepoint folder. Follow the prompts to install to the local PC.
- For both Snippets and Sharepoint Integration, you will be notified that the installation is complete. Click Close.
Launch Microsoft Word and confirm that the Snippets button is available on the Home ribbon.
System Requirements
Mosmar Snippets can be installed and run on the following operating systems:
- Windows 10 onwards
and is compatible with the following, locally installed, Microsoft Office versions:
- Office 2010, 2013, 2019 and Office 365
Pre Configuration
- Extract the files from the Snippets.zip file as provided to you by Mosmar.
- Right click the SnippetsSettings.xml file and open with Notepad
- Confirm Licence Details – these should have come prepopulated from Mosmar, but you may need to adjust the licencing over time. Below is an example of the licence configuration:
<LicenceDetails>
<Licensee>Mosmar</Licensee>
<LicenceType>01/10/2022</LicenceType>
<NumberOfUsers>500</NumberOfUsers>
<LicenceKey>LEDW QS9N JEK1 1G6D</LicenceKey>
</LicenceDetails> - Confirm the base location of your Sharepoint folders/libraries (if using Sharepoint)
https://clientname.sharepoint.com/sites/clientname - Configure the Snippets locations, names and permissions
- Name: This is the name that will appear in the Snippets pane
- Path: The full location to the Snippets library. If Sharepoint, please enter the full path. If a network path, enter either the drive mapping or the UNC value
Updating configuration post install
To update the configuration, update the SnippetsSettings.xml file with the changes and deploy the file to the required users via Group Policy or login batch script, pushing it out to the install file you specified in the installation process.
It would likely be c:\program files\mosmar\snippets\configuration.
Get help from Mosmar
Can’t find the answer here? Get in touch with the team